How to connect a 3D printer to a computer
Steps you need to do
For 3D printing you need to complete a few steps with your computer. As 3D printers for home users are relatively new, the machines are often not plug and play machines. In general, the following steps need to be fulfilled:
- To connect your printer, you need to plug it in using USB.
- Your computer needs to install the printers driver software just as it does when using other USB devices like a USB mouse.
- A printing software should be installed that either comes with the printer or has to be downloaded. There is a software that can preprocess your 3D model for printing called Repetier-Host which we will use.
- As this Repetier-Host can be used for any 3D printer, it needs to know the specifics of your printer.
Connecting via USB
Most 3D printers can be connected via USB to your computer. Just use the cable that comes with your printer and always use it at the same USB port when possible. Make sure this USB port is working properly so no later communication problems arise.
![Many 3D printers are run by Arduino microcontrollers.
Arduino-uno-perspective.jpg: Creative Toolsderivative work: JotaCartas [CC BY 2.0 (https://creativecommons.org/licenses/by/2.0)]](https://stage.geogebra.org/resource/m5vgmedz/ToU6jmtTfDyW2EAy/material-m5vgmedz.png)
Installing the driver software
Depending on your operating system, printer drivers may be installed automatically. Often, newer operating systems like Windows 10 can do that. Also, there might be a 3D printer driver software that has also been shipped with your printer. Install it like you used to install driver software for computer mouses a while ago.
In case you have an old operating system and no driver software was shipped with your printer, it needs to be installed manually.
Two drivers usually work:
- Arduino drivers
- CH340/CH341 drivers
If you use Windows you can follow the steps described on the Arduino homepage: https://www.arduino.cc/en/Guide/DriverInstallation even if your printer is not Arduino-based.
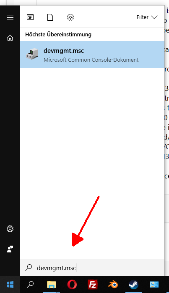
- Open the device manager where you usually used to install driver software. If you do not find it in the Windows start menu, click on the Windows button and type devmgmt.msc - that is the device manager.
- Disconnect and reconnect the 3D printer by unplugging and replugging the USB cable to see which device in the list is popping up - this is your printer. It might has a yellow warning sign which means that a driver software is required.
- Right click on the icon of the printer. This opens a menu where you find the option install/update driver. This should download the required drivers or on older Windows versions will trigger an update to get them online.
Find the device manager quickly
If this is not working, you will have to install the drivers manually from the Arduino website directly. Installing the Arduino drivers works best by downloading the so called "Arduino IDE". You can download at
https://www.arduino.cc/en/Main/Software
Install the Arduino IDE by following the steps on the website. There are alot of different drivers in the package and you will have to agree to every single one to be allowed to be installed.
In case this does not help either you have a CH340/CH341 microcontroller in your 3D printer. You can get the drivers from the following link:
Since the producer of the microcontroller does not provide a package of driver software, these links might be invalid in the future. If that happens, google for CH340 or ch341 driver download and be sure to use an anti-virus/malware software to scan your download before installing.

Downloading Repetier-Host and setting it up
There is either a software that comes with your printer or you might use other software like Repetier-Host to connect your PC to a 3D printer.
You can find Repetier-Host at https://www.repetier.com/ and should choose a version for your operating system. This software is free but in case you are thankfull of and happy about it, you are kindly asked for a donation to keep it developed.
This software provides several features:
- adding the 3D model to the build platform, move, scale, duplicate or mirror it
- cutting your 3D designs into slices using a software called slicer - we will use the CuraEngine
- creating a file containing information what exactly your 3D printer should do called a G-Code file
- connecting to and controlling of your 3D printer - if you so choose
- is the 3D printer powered and switched on?
- is the 3D printer connected properly to your PC?
- have you selected the correct port for communication?
- have you selected the correct speed to send the G-Code commands - the baud rate?
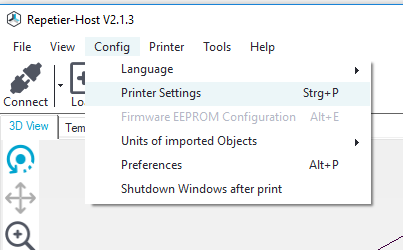
For a good printing result, not only being able to talk to the 3D printer but also specifics are important. Find the settings you need to adapt at “Config” -> “Printer Settings”
Which port is the one that talks to the 3D printer?
You can find the port by trial and error since there will only be a few ports listed. If your printer is powered and connected via USB, select one port option after the other and and try to connect to your printer with each by pressing the pug icon on the upper left in Repeter-Host. If the port is not valid, an error message will pop up. If it is the correct port, you should be able to connect.
Find the port and baud rate
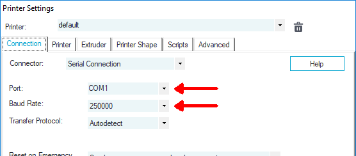
How fast are you talking to the 3D printer?
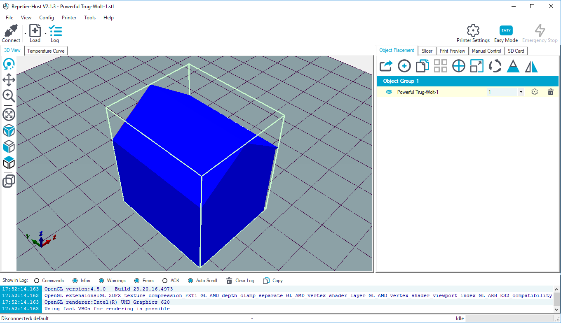
When you connect, you see loads of communication between your PC and your 3D printer shown at the bottom of Repetier-Host in the log which you can find on the bottom of the Repetier-Host window. If you can read it, meaning that you can only see human readable entries, your baud rate is correct. If you see strange characters which you cannot interpret, you have to change your baud rate. Start with the highest and reduce it try by try, until you see human readable output in the log. Usually log entries containing G-Code start with “M…”, “G…”, or “T…”.
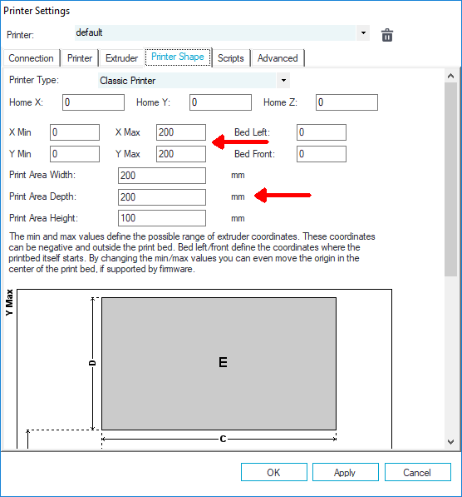
How big is your printer?
Also in the printer settings, you find "Printer Shape" where you should set the X and Y maximum to the size of your printing plate.
Then again add the width and depth to the values of X and Y and also add a maximum print height.
Do not forget to Apply all changes.
If you are done with these steps you should be able to click the icon on the top left with the plug and connect to your printer.